Hi babies. I wanna get back into this. Who missed me? 😘
Hi.
07 Monday Dec 2015
Posted in Uncategorized
07 Monday Dec 2015
Posted in Uncategorized
Hi babies. I wanna get back into this. Who missed me? 😘
02 Friday May 2014
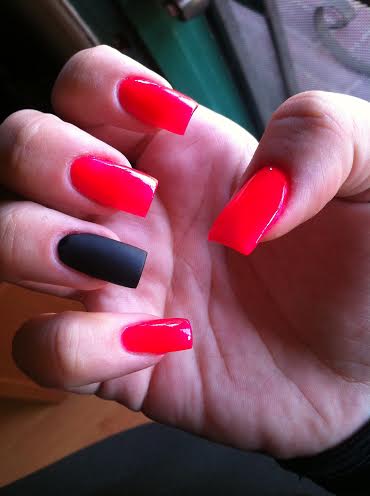
I’m loving this pink! This picture does not do it justice. My ring finger is a matte black, while the rest have a shiny top coat.
What do you darlings think?
xoxo,
sammysalterego ❤
Posted by sammysalterego | Filed under Uncategorized
30 Wednesday Apr 2014
Posted in Makeup, Uncategorized
Tags
affordable, beautiful, beauty, blog, blush, bronzer, brushes, eyeliner, eyeshadow, fashion, girls, influenster, lipgloss, lips, love, makeup, marykay, mascara, photography, powder, quotes, savings, sexy, sky, spring, trends

I received all of these products complimentary from Influenster for testing purposes. If anyone wants to know how Influenster works, I will be glad to answer any questions!
These are all of the items included in the box:


RETAIL PRICE: $15.00

RETAIL PRICE: $14.00

RETAIL PRICE: $12.00
RETAIL PRICE: $16.00

RETAIL PRICE: $18.00

RETAIL PRICE: $18.00

RETAIL PRICE: $14.00

RETAIL PRICE: $10.00 (The brush on the top)
RETAIL PRICE: ? (The brush on the bottom)
 Excuse my eyebrows! They’re a little messy today.
I used all of the Mary Kay Products I received in this look!
Overall, I loved all of these products! They all were made with quality and work really well.
I already got compliments on my lip color!
Let me know what you guys think!
xoxo,
sammysalterego ❤
Excuse my eyebrows! They’re a little messy today.
I used all of the Mary Kay Products I received in this look!
Overall, I loved all of these products! They all were made with quality and work really well.
I already got compliments on my lip color!
Let me know what you guys think!
xoxo,
sammysalterego ❤
22 Tuesday Apr 2014
Posted in Quotes, Random thoughts, Uncategorized
Happy belated Easter to all those who celebrated and happy belated 4/20 to the rest of you!
I’ve realized lately how easy it is to regret something you’ve done in your life. Whether it is a simple decision you made or if it was life altering, you never really know the effect it is going to give you until quite sometime after.
I’ve found myself asking the question: “Am I going to regret this?” more often than I ever have lately before I do something. Yet, I have also noticed that sometimes I take a risk not caring how it will affect me later, simply because life is short and you should take some risks.
If I have any advice to offer about decision making, I would definitely recommend taking a second to think about the effect that it will have on you. You’ll find yourself more at peace when you know that you took the time to contemplate what the right thing to do is.
Oh, and if you are thinking about a specific decision you need to make while reading this, which I know you are 😉 I think you should take the risk, because frankly its better to live and learn. No one’s perfect, remember that.
I’d rather regret the things I’ve done than regret the things I haven’t done.
p.s. why is this blog post so random?
p.p.s always look sexy, because if you look sexy you feel sexy and if you feel sexy you can accomplish anything in this world.
What do you think?
xoxo, sammysalterego26 Wednesday Mar 2014

Name the top lies females tell, I’m dying to hear your answers!
Posted by sammysalterego | Filed under Quotes, Uncategorized
20 Thursday Mar 2014
Posted in Makeup, Uncategorized
Tags
beautiful, beauty, blog, easy, eyelash, eyelashes, eyes, eyeshadow, lashes, makeup, mascara, maybelline, nails, photo, photography
Yes, these are my REAL eyelashes! (apologizes for the blurry picture)
Obviously I already have long eyelashes, but unfortunately I don’t wake up with them like this.
If fake lashes aren’t your thing, use these tips to help you get the longest length possible!
My secret:
MY MASCARA:

MY EYELASH CURLER:

XOXO,
sammysalterego
18 Tuesday Mar 2014

Posted by sammysalterego | Filed under Quotes
16 Sunday Mar 2014
Posted in Nails, Uncategorized

Here’s my current nail situation. Matte is totally in right now and you just can’t go wrong with a matte coat on any color. Plus little diamond accents on my ring finger (since I can’t have the real ones)
Let me know what you think!
Nail Color: Black
Matte: OPI matte coat
16 Sunday Mar 2014
Posted in Makeup, Uncategorized
Tags
affordable, beautiful, beauty, chapstick, cheap, fashion, foundation, girls, gorgeous, liner, lipgloss, lips, lipstick, love, makeup, nude, nudelip, perfect, savings, sexy

We all know how difficult it is to find the perfect nude lip color for your skin. I’ve gone through so many different shades in an effort to find the perfect color match for my skin tone, not to mention sort of burning a hole in my wallet with expensive brands. I’ve given up on spending big bucks on make-up looks that can be much more affordable, and I hope I can help out my fellow make-up lovers save some cash as well!
STEP 1: NO LIP LOOKS GOOD WHEN CHAPPED! (SKIP THIS STEP IF YOU HAVE LUSCIOUS SMOOTH LIPS)

Let’s get real, no one likes a chapped lip. If you keep wondering why no lipstick/lip-gloss/etc. looks good on you, your problem is most likely a chapped lip. The key to fixing this is time and moisture…aka USE CHAPSTICK, DUH! Use chapstick when you wake up, when you’re eating, when you’re at work, when you’re at school…basically all the time! Most importantly when you sleep. I don’t care what kind of chapstick you use as long as it moisturizes and has sunscreen. Once you see results, keep using it in order to prevent your lips from getting chapped again.
STEP 2: USE YOUR FOUNDATION!

Surprise! Surprise! This is the trick to a perfect and affordable nude lip. Your liquid foundation is as close as you’re going to get to a nude that matches and compliments your face perfectly. Not to mention you already have it, therefore you do not have to buy anything extra! I’m basically giving you a nude lipstick for free here, be thankful! Apply your foundation on your lips using a lip brush, if you do not have one your fingers will work just fine. Now, it’s going to give you a dry matte look which means it won’t have any shine. Depending on the type of look you are going for, this might be as far as you go.
STEP 3: GIVE IT SHINE!
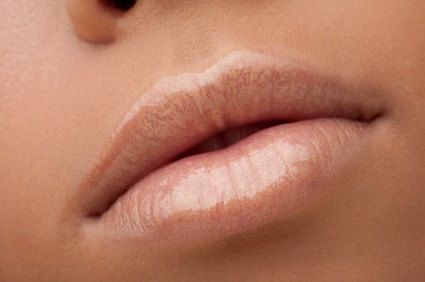
If you’re like me you love everything that shines, especially on your lips! There are 2 easy and affordable options you can use for shine:
1) Chapstick: This is the most affordable option and will give you a soft shine that is also NOT sticky.
2) Clear lip-gloss(my fave): This is a bit more expensive but will give you the most shine.
EXTRA STEP: LIP LINER! (USE BEFORE STEP 2)

You can definitely do without lip liner, but this is a great way to ensure that it doesn’t look like your face is blending in with your lip. Don’t stress yourself out too much on picking the right color. The easiest way to do it is to match the liner with your natural lip color! Now you have a liner that you can use with a nude lip AND many other lipsticks. Once you are ready to apply your liner, always remember one key word: BLENDING. The key to applying your liner is to not only outline your lip but also blend it a little into your actual lip all the way around. Then when you apply your foundation as a lip color you can blend the foundation into the liner.
QUICKSTEPS:
WHAT YOU’LL NEED:
14 Friday Mar 2014
Posted in Uncategorized
Tags
I just spent 4 hours trying to choose my blog name, finally came up with one.Who knew it was so difficult to choose a blog name?! Guess I’ll have to start blogging tomorrow!
Goodnight world.
